 Clearly I lied in the last post and did not get to writing another, until now. I should stop trying to predict the future in my posts, because it's shocking how often things I predict don't come to pass. Or maybe I should predict things I don't want to happen, so there's a lower possibility of them occurring. Either way, here I am again with another update on some speedpaints, only two months after I actually did them. Back to December for this round. For the sake of my schedule though I'll try and keep this one fairly short. On the other hand though, videos!
Software: Photoshop
It's a monster taking a selfie. What more do you need?

Time Taken: 90 minutes
Software: Photoshop
Based on: http://fav.me/d4q8kuy from randomactscreative.com
Loved the lighting and colour on the original reference, so I had a go at recreating it. I also had a go at capturing one of those fancy timelapse videos, and finally got it working out. So, no step by step, just a video. Fun.
So as you can see, I have the original image open on the left while I paint on the right. I used to have the reference open on my right monitor while I painted on the left one, but since I've started working with a Cintiq having a reference on my other monitor is only good for the occasional glance, so this works out better.
I have the images set to the same resolution, which means I can zoom in and then scale the other one to match with a keyboard shortcut. You'll see my cursor appearing over the original image fairly regularly, especially at the start - this isn't me colour sampling it (I didn't sample any colours from the original here), but rather how I measure it. Hover over a point, and then flick my hand to a second point. Do that a couple of times and then use the muscle memory to do the same on the other window, but this time while drawing a stroke. It's not as accurate as measuring properly, or using a grid, but it is fast and usually close enough.
If it's worth me doing more of these (there's another one along in a minute), let me know in the comments (you may need to brush aside some cobwebs down there).

Software: Photoshop
Not a finished piece by any means, but what I'm hoping to do more of from now on. A piece from which I could develop something more finished from should I want to. It's not really based on anything specific, though the pose is similar to one I saw on Pinterest. Mostly I was just interested in blending some Medieval looks with some sci-fi tech.

I don't love the piece, but I quite like the outfit for the most part (not sure about the stomach region though, but it's better than just showing a midriff I suppose).

Time Taken: 190 Minutes
Software: Photoshop
Based on: A photo I took in St. Petersburg
Part of my Designated Area series, this is from where I had to stand outside the hotel if I wanted a smoke. There were more people around in the original, but I left them out to save time.

Due to jetlag I was outside at some fairly strange times of day. Twice while I was out there I encountered a young woman seemingly taking her horse for a walk. She offered to let me ride it for a fairly small price. I'm not sure this would have been pleasant for the horse - I'm a pretty big guy, and it was a fairly small horse - so I declined. The young woman did not seem terribly impressed by that. I was mostly impressed that she started off speaking English, but I suppose there's a reasonable chance a tired looking white guy standing outside a St. Petersburg hotel at 4am is a jetlagged visitor who speaks at least some English.

Time Taken: 130 Minutes
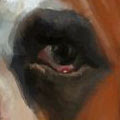
Software: ArtRage
Based On: A photo of our Foster Dog, Molly
As you can see, I use a quite similar setup in ArtRage as I do in Photoshop. Ref to the left, paint to the right. The main difference is that I can't easily scale the ref to match the canvas size (I left the bit where I try and get them close at the beginning out of the video). There are a couple of jumps here and there - that's where my recording ran out and I didn't notice to start it up again for a minute or so. You'll note I moved one of here eyes at one point - I like to avoid doing that, but I quite liked how the eye looked, and didn't want to repaint it. I think this one is recorded at a more frequent rate than the previous one, so you're seeing it at a slower speed.
And that's it for today! No promises, but I'll try to be back before the end of the month so I'm only posting paints after a maximum of a month, rather than two (ugh, I can barely remember painting half of these ;))
Software: ArtRage
Based On: A photo of our Foster Dog, Molly
We fostered a dog for a week after Christmas. She ended up going to a new forever family after that, because right now we don't have time to introduce a dog into our lives full time (I can barely find time to write blog posts!). Anyway, if it wasn't for our schedules we might have taken her ourselves because she was the most ridiculously well behaved Dog I've even met. OK, enough about Molly, here's another video, this time from Artrage.
As you can see, I use a quite similar setup in ArtRage as I do in Photoshop. Ref to the left, paint to the right. The main difference is that I can't easily scale the ref to match the canvas size (I left the bit where I try and get them close at the beginning out of the video). There are a couple of jumps here and there - that's where my recording ran out and I didn't notice to start it up again for a minute or so. You'll note I moved one of here eyes at one point - I like to avoid doing that, but I quite liked how the eye looked, and didn't want to repaint it. I think this one is recorded at a more frequent rate than the previous one, so you're seeing it at a slower speed.
And that's it for today! No promises, but I'll try to be back before the end of the month so I'm only posting paints after a maximum of a month, rather than two (ugh, I can barely remember painting half of these ;))


wow! you have created these awesome graphics that look so real. Your skill is improving day by day and I hope that you will achieve mastery in no time. Great art work!
ReplyDelete